Data Studio analysis editor
Once you start the analysis and the initialization process is completed, you will be automatically taken to the editor. The editor provides native interface for the chosen analysis environment and the additional Seven Bridges Platform navigation and content management options.
Separate domain (sb-cruncher.com) is used for serving Data Studio editors, which provides better security isolation and privacy control of your favorite third-party integrated development environment.
Data Studio uses the cloud infrastructure to run your analyses - each analysis execution is run using a virtual computing environment also known as instance.
To help you navigate through your working space and provide you with easy control over your data, this is a directory structure that is automatically set up on an instance when an analysis is started:
/sbgenomics
|-- workspace
|-- project-files
|-- output-files
Manage your notebooks and scripts (workspace)
workspace)This is the default directory where your analysis takes place. All your notebooks and scripts created using your editor of choice are automatically created here. You can also:
- Upload files to the analysis workspace directly from the local machine using the native upload option in your editor of choice.
- Download files into the analysis workspace directly from a location on the Internet (using cURL or wgetin the terminal, for example).
All workspace content will be automatically available for each new analysis run.
Make sure to avoid special characters such as
^,$,+,[]in file and folder names.
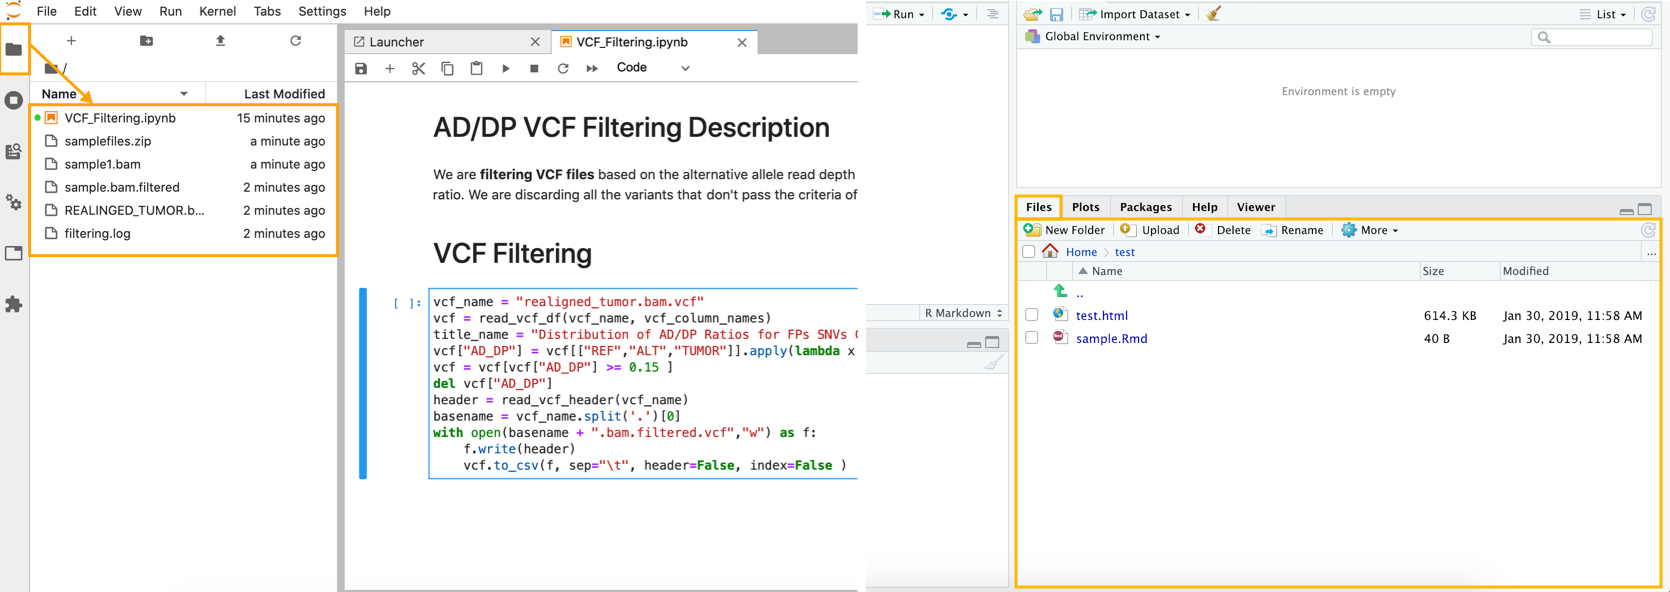
The image illustrating how workspace files are displayed in JupyterLab (left) and RStudio (right):

Once the analysis is stopped, all workspace content will automatically be saved and available via the analysis details page for preview.
Find your inputs (project-files)
project-files)The project-files directory provides a convenient way to use files from the project in which your analysis is located. All files that are available under the Files tab when viewing a project through the visual interface are mounted inside the /sbgenomics/project-files/ folder in a Data Studio analysis.

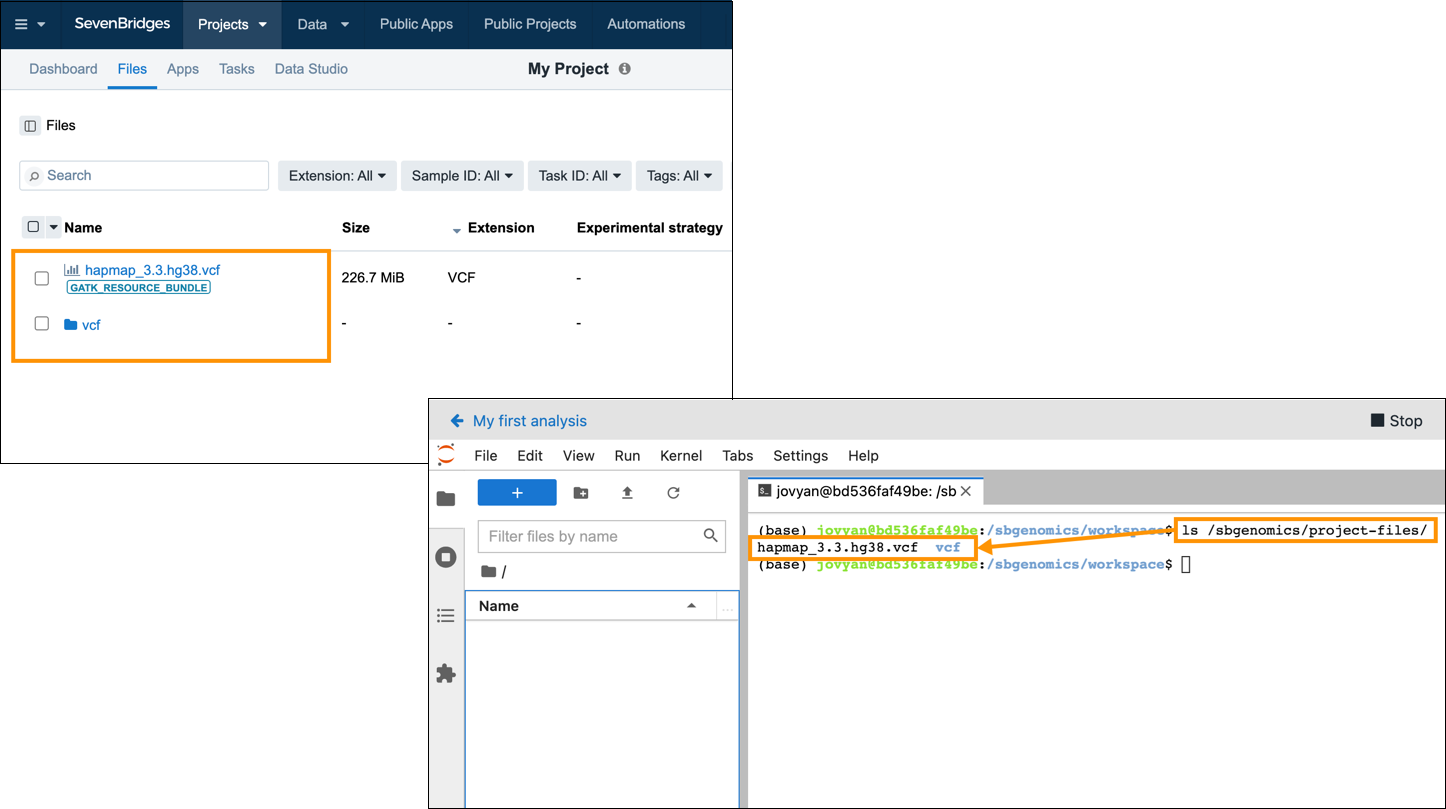
To reference a project file in your Data Studio analysis, simple use its /sbgenomics/project-files/<file-name> or /sbgenomics/project-files/<folder-name>/<file-name> path. For example, if there is a file named hapmap_3.3.hg38.vcf in your project and you need to reference the file in your Data Studio analysis code, you would do it by entering the /sbgenomics/project-files/hapmap_3.3.hg38.vcf path. If the file is not located at the root of your project files, but is in a subfolder named for example vcf, the path would be /sbgenomics/project-files/vcf/hapmap_3.3.hg38.vcf. To see all project files that are available for use in your Data Studio analysis, open a terminal window in your Data Studio analysis and execute the following code:
ls /sbgenomics/project-files/This lists all files available in the project in which you are executing your analysis.
Note that all project files are read only, and are mounted using the Seven Bridges proprietary tool that enables actual content to be downloaded when files and file parts are needed in the analysis, rather than downloading all content at once. Since project files are mounted as read only, their content can be accessed, but can't be changed.
Save analysis outputs (output-files)
output-files)This is the target directory to store files that you want saved as outputs of your analysis. Once the analysis is stopped, all output files are being uploaded directly to your Project files so you can use and analyze them in other executions. Once saved, the files will be accessible at the root of your project files, directly under the Files tab when accessing them through the visual interface. If any naming conflicts with existing Project files are encountered, newly-saved files will be automatically renamed to avoid overwriting existing ones. All your analysis outputs are traceable and links are available via the analysis details page. To save analysis outputs, follow these steps:
-
JupyterLab:
- Click File > New > Terminal. Terminal opens in your
workspacedirectory. - Use the
cpcommand to copy the files you want to save to theoutput-filesdirectory, for example:cp my_file.ext ../output-files/.
- Click File > New > Terminal. Terminal opens in your
-
RStudio:
- In RStudio, open the Terminal tab.
- Use the
cpcommand to copy the files you want to save to theoutput-filesdirectory, for example:cp my_file.ext ../output-files/.
Please note that file saving takes place only while the analysis is being stopped. When you click Stop, this will trigger the saving process and the analysis status will change to SAVING. Once saving has been completed, the analysis status changes to SAVED.
Updated 3 months ago
