
Publish your app in the Public Apps gallery
How to publish projects and apps on Seven Bridges
This article explains how to prepare and submit projects, and apps for publication on the Seven Bridges Platform. You will learn how to properly organize and format your projects and apps prior to publishing, how to benchmark your apps, and how to initiate the publishing procedure.
After publishing, the published project(s), and/or app(s) will become visible and made available publicly, to all platform users. They will be discoverable under the Public Projects, and Public Apps tabs.
Publish a Project
Publishing follows the same basic workflow for projects and apps: develop and test assets in a Development project, copy the publication-ready assets to a stable Commit project, verify that the Commit project runs independently, add the sevenbridges user, and contact [email protected]. The sections below explain the requirements for each asset type.
How to Publish a Project
Create the Development project. This is your testing project; none of the changes you make here will be reflected in the published project. You will use this project to make sure that any apps, and Data Studio analyses that you want to publish work properly. Optionally, here you can also benchmark any app that you want to publish with the project.
What should you do here? Checklist:
-
Make sure that all apps (both tools, and workflows) run, complete successfully, and produce expected outputs.
-
Make sure that the apps meet the publishing standard.
-
Make sure that the Data Studio notebooks meet the publishing standard:
- If your notebook expects the user to be able to execute code, make sure that all notebook cells include detailed documentation and guidance for the users. Whenever possible, add Markdown descriptions for the code blocks where you detail what the code does and how it’s used.
- Verify that all executable cells are run successfully and without errors.
- If the Data Studio notebook requires non-default resources (like a GPU instance, or an instance with higher CPU/RAM/disk requirements), select the instance type for that notebook. You can do this on the settings tab of an existing notebook, or at the time of creating the notebook.
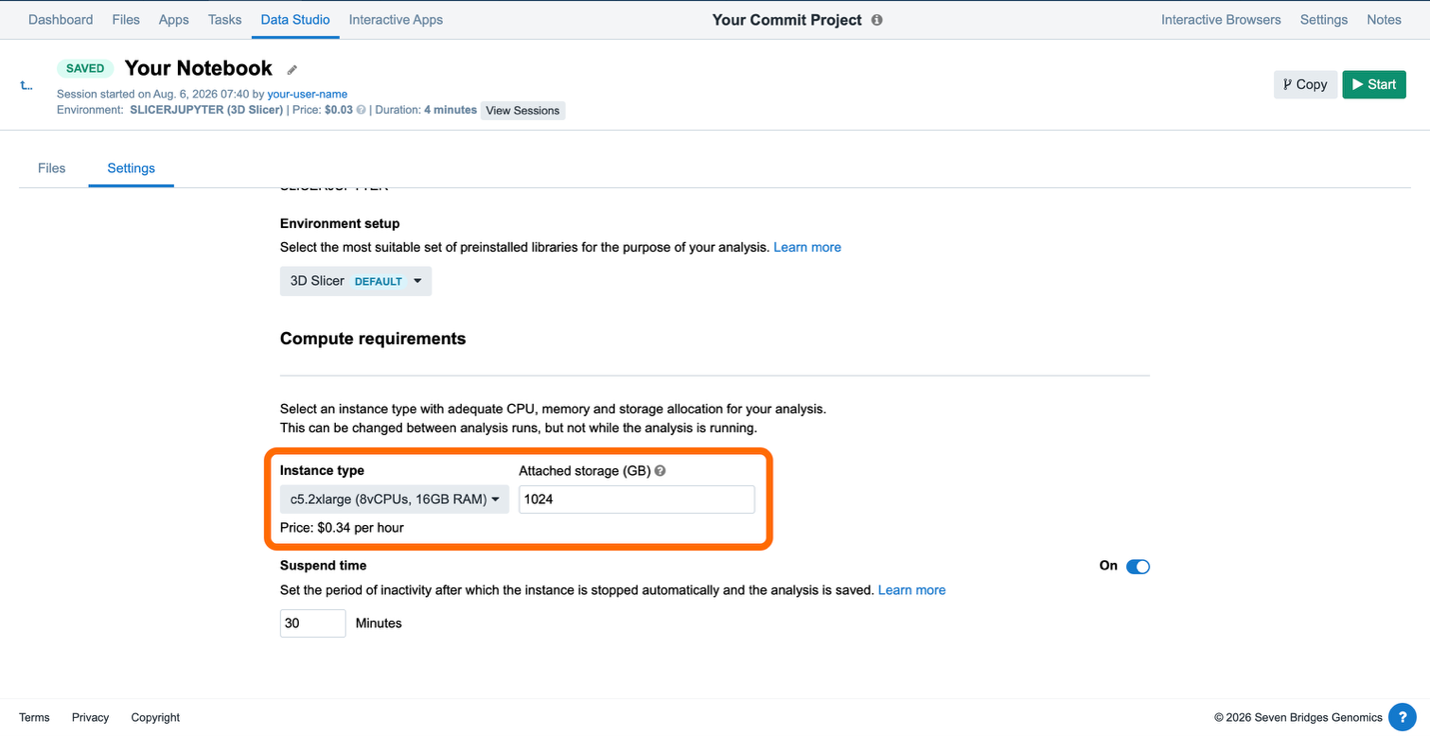
- Please make sure to thoroughly test the session with an example dataset (or any other inputs) and keep the dataset in the Data Studio session workspace.
Once you are done with development, create the Commit project. Please make sure that the Commit project is not a Controlled project.
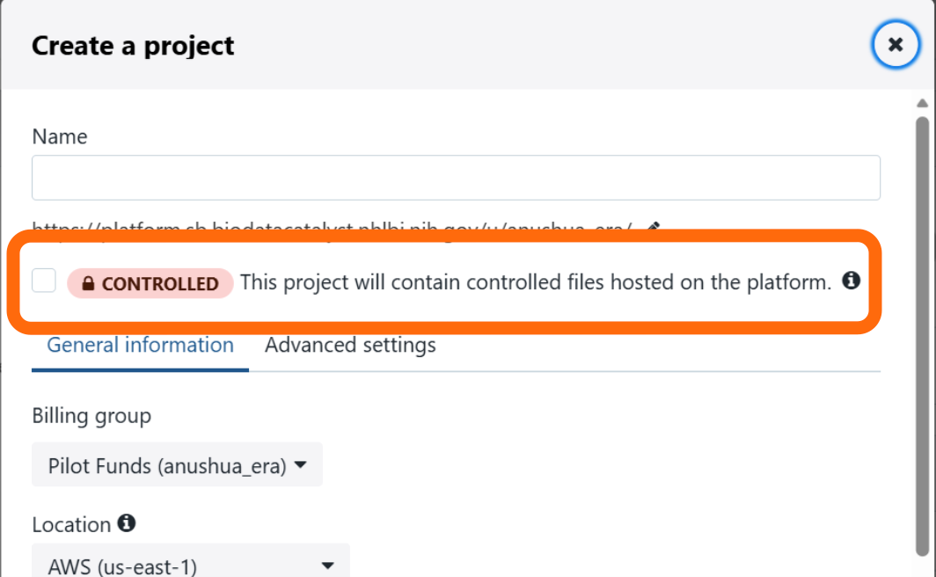
This project should be in a ready-to-publish state. This is what other users of the platform will see once the publishing procedure is complete.
What should you do here? Checklist:
- Copy Files. Copy all necessary files from the Development project to this project. This should include reference files, datasets the project uses, and any other file the user should be able to see. If this project should contain the outputs of a task, you should generate these outputs again by running the task instead of copying them.
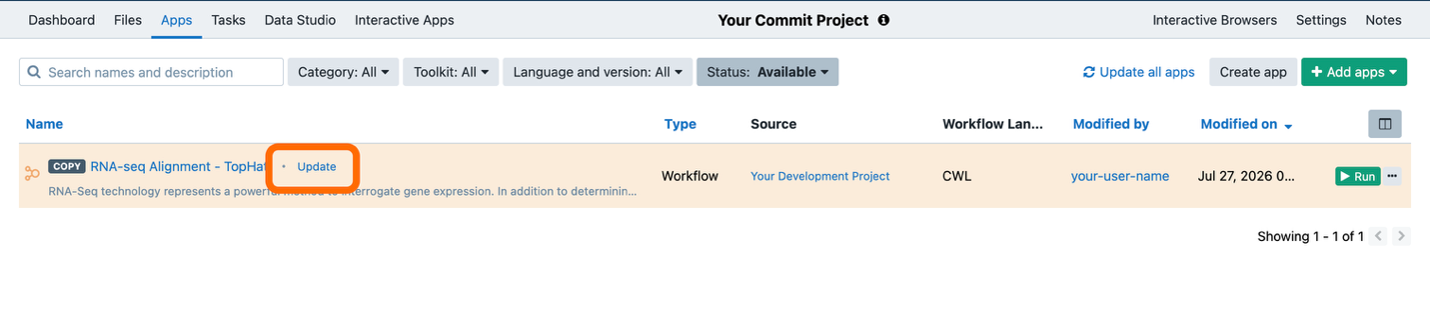
No additional storage costs. The files you copy will not incur additional cost for storage, like with all your existing projects. Copies of files are treated as the same file when calculating the storage costs. - Copy apps. Copy all apps that you want to publish with the project. To make future updates of the app easier, make sure that the Commit project contains a copy of the Development project’s app created through the platform “Copy app” functionality. This will preserve a connection between these two versions of the app, and when you need to update the Commit project version, you will only need to click the “Update” button that will show up next to the app.
- Copy Data Studio notebooks. Make sure that the datasets are still included in the workspace of these notebooks.
- Rerun Tasks. If the project should contain task runs, rerun these tasks here in the Commit project as well.
- Update The Project Description. The project description should describe what the project is about, and how to properly utilize the assets within (apps, notebooks, files).
From both a maintenance and a security point of view, we also recommend that you keep the project members to a minimum.
When you are done creating the Commit project, and have verified that the project is able to run independently from the Development project, add sevenbridges user, and contact [email protected] to publish the project.
How to Publish an App
As with project publishing, begin by creating a Development project and a Commit project for the app. Develop, benchmark, and test the app in the Development project. When the app is ready, copy or update the publication-ready version in the Commit project.
- The Commit project for the app should contain:
- The app (tool or workflow) that you want to publish.
If the application requires specific input files, these should also be included in the Commit project.
From both a maintenance and a security point of view, we also recommend that you keep the project members to a minimum.
Unlike the publishing procedure for projects, for applications, you should only make sure that the app that you are publishing meets the publishing criteria.
App Info
The app description should help the user of the application understand what the app does, how to run it, and how to interpret its outputs. It should include:
- Documented inputs and outputs. If the input files have required metadata fields, list them here as well.
- Required input files.
- Known limitations, issues, and errors.
- Include DOIs or URLs where applicable.
- Filled app details with the source (if applicable) and references. These can be found under App Info tab in the CWL editor page below the “Description”. They include:
- Toolkit and Toolkit version (ex. VarScan2 2.3.9),
- Toolkit Author (ex. Genome Institute at Washington University),
- License (ex. Non-Profit Open Software License 3.0 (Non-Profit OSL 3.0)),
- Category (ex. Variant Calling). Best practice would be to use a predefined value from the list in the CWL editor. If there is no relevant category listed, please contact our support [email protected].
- Links. Add any relevant links for the application, like a link to the sourcecode, publication, homepage, etc.
- Common use cases
- Describe how to run the app/workflow.
- Explain optional but important parameters.
- Common issues and important notes
- Known issues or alternative execution methods.
- Required metadata settings.
- Secondary file requirements, such as index files.
- Limitations
- Known errors or edge cases.
- Resource requirements, such as minimum RAM, CPU, and disk space.
- Scale limits, such as maximum file size, maximum number of samples, or other relevant platform constraints.
Inputs and Outputs
- Every input and output port must have a unique ID, type, label, File type(s) (if applicable) and description. For example:
- ID: output_format
- Type: File
- Label: Format of output files
- File type(s): BAM, SAM, CRAM
- Description: Write the final output in BAM, SAM, or CRAM format.
[Optional] Performance Benchmarking
If you have performed benchmarking of your app on the platform, it is useful to include a table with benchmarking performance data. This table should minimally contain information about the size of the most relevant input files, on average how long the task took to complete, and how much it costs. If applicable, you should also include some of the instance hints used, or other information that could help a user replicate your results if needed.
Example:
| Input size | Experimental strategy | Coverage | Duration | Cost(on demand) | AWS Instance type |
|---|---|---|---|---|---|
| 4.6 GiB | WES | 70 | 1h 23 mins | $2.68 | c5.9 |
| 2.3 GiB | WES | 40 | 45mins | $1.47 | c5.9 |
| 89.0 GiB | WGS | 30 | 1 day 3h | $52.98 | c5.9 |
| 29.8 GiB | WGS | 10 | 10h 1min | $19.38 | c5.9 |
When you are done creating the Commit project, and have verified that the project is able to run independently from the Development project, add sevenbridges user, and contact [email protected] to publish the app.
Updating Published Projects and Apps
If you want to update a project or app that you have published, make sure that the Commit project is up to date with the changes that you made in the development project. If there are any new required input files added, make sure that the Commit project contains these files as well.
To synchronize the Commit Project with the Public assets, you will have to contact the support team [email protected]. The process may take a few days, so avoid making further changes to the Commit project until you get confirmation from the support team that your Commit project and the Public project are synchronized.
Updated 2 months ago