Nexttflow CLI app upload tutorial
Objective
The goal of this tutorial is to show you the entire procedure of bringing a Nextflow application to the Seven Bridges Platform and running the application at scale using test data that is already available on the Platform. We will be using the nf-code/rnaseq pipeline from the nf-core GitHub repository of curated pipelines built using Nextflow.
Prerequisites
- An account on the Seven Bridges Platform.
- Set Platform credentials in the unified configuration file.
Procedure
The procedure of uploading and running a Nextflow app consists of the following steps:
- Install sbpack.
- Download the rnaseq pipeline from the nf-core GitHub repository.
- Create a project on the Platform.
- Perform initial app conversion and push to the Platform.
- Customize app configuration.
- Push the optimized app to the Platform.
- Verify that the update is visible on the Platform.
Install sbpack
This step takes place in the terminal on your local machine.
The primary use of the sbpack command-line utility is to provide an easy way to upload (sbpack) and download (sbpull) apps to/from any Seven Bridges powered platform. To install sbpack, use the standard install method through pip:
pip install sbpackTo verify that sbpack is installed correctly, display its inline help using the following command:
sbpack -hThis shows sbpack version information and the list of available arguments.
Download the rnaseq pipeline
This step takes place in your browser.
We will be using the nf-code/rnaseq pipeline to demonstrate how it is prepared, customized and pushed to the Platform for execution. To download the app:
- Navigate to <https://github.com/nf-core/rnaseq> in your browser.
- Click the Code dropdown and select "Download ZIP". An archive containing the Nextflow pipeline is downloaded to your local machine.
- Navigate to your local download location and unzip the downloaded package into a folder named rnaseq-master. The folder contains the entire set of app-related files, the most important ones being:
main.nfnextflow.confignextflow_schema.json
Create a project on the Platform
This step takes place on the Platform.
For this tutorial, create a dedicated project named Nextflow Project on the Platform by following the steps below:
- Log in to the Platform.
- Click Projects in the top navigation bar and select "Create a project".
- Name your project "Nextflow Project".
- Keep the default values for all other project settings.
- Click Create. Your new project is now created.
Perform initial app conversion and push to the Platform
This step takes place in the terminal on your local machine.
This step adapts the Nextflow app for execution on the Seven Bridges Platform. It is performed by executing the sbpack_nf command in the following format:
sbpack_nf --profile <profile-name> --appid <division-name>/nextflow-project/rnaseq-demo --workflow-path <path-to-rnaseq-master-folder> --entrypoint main.nfMake sure to replace the following placeholders in the code above:
<profile-name>: replace with the name of the configured profile in your credentials file, for example default.<division-name>: replace with your division on the Platform, for example sevenbridges-division.<path-to-rnaseq-master-folder>: full path to the folder that contains the Nextflow files, for example/Users/rfranklin/apps/nextflow/rnaseq-master.
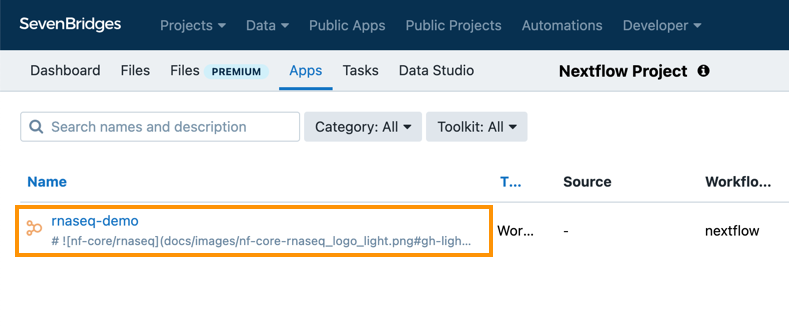
When you execute the command, it starts the process of converting and uploading the initial version of your Nextflow app. Once the upload is completed, you will see your app under the Apps tab in the Nextflow Project on the Platform:

Customize app configuration
This step takes place on your local machine.
To demonstrate how app configuration is changed for execution on the Platform, we are going to change the input type of the validationSchemaIgnoreParams input from string to enum. To make the change, follow the steps below.
- Open
sb_nextfow_schema.yamlin a text editor. - Use text search to find the
validationSchemaIgnoreParamsinput parameter. Its current type is string, meaning that the input will be rendered as a free-form text input field when used on the Platform. However, there are expected values for this input that are indicated insbg:toolDefaultValueand we want to make the input a dropdown containing these values, instead of it being a string. - Under type, remove the entire
- stringline. This removes the existing input type, so we can set a new one. - Under
- null, create a new line and enter the following code:
- items:
    name: validationSchemaIgnoreParams
    symbols:
    - genomes
    - igenomes_base
    type: enum
  type: array
This creates an list of predefined values that can be selected before running the app on the Platform.
Verify that the update is visible on the Platform
This step takes place on the Platform.
-
In your Nextflow Project on the Platform, navigate to the apps tab and click the rnaseq-demo app. App details are displayed.
-
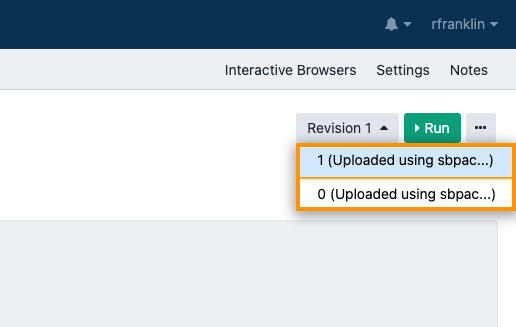
In the top right corner, click the Revision 1 dropdown. A list opens, showing Revision 0 as the initial version of the app that was pushed to the Platform during conversion and Revision 1 as the new app revision. This means that the updated and customized version of the app has just been pushed to the Platform successfully.
-
Click Run in the top-right corner. A draft task is created.

-
In the App Settings list, find the
validationSchemaIgnoreParamsinput parameter. -
Click + next to the parameter name. A dropdown opens and you can select one of the two predefined items as its value, which means that the change in configuration of this specific input is now properly visible on the Platform.
This concludes the Nextflow Quickstart Tutorial. After successfully completing it, you should be able to convert a Nextflow app for use on the Platform, make minor modifications to app parameters and re-upload customized apps for execution on the Platform.
Updated 3 months ago
