Manage Docker repositories
If you are an Enterprise user, please use the Docker for Enterprise page and learn how to manage your Docker repositories in the Enterprise context.
Overview
Manage your Docker repositories by specifying privacy settings and designating specific levels of access for each member of your repository. A repository (or "repo") is a container which holds multiple revisions of a docker image.
Furthermore, each revision is called a "tag" and every image is described by the repository name and a tag, e.g. <repository_name>[:tag].
Create a repository
- Click on Developer in the main menu bar and choose Docker registry.
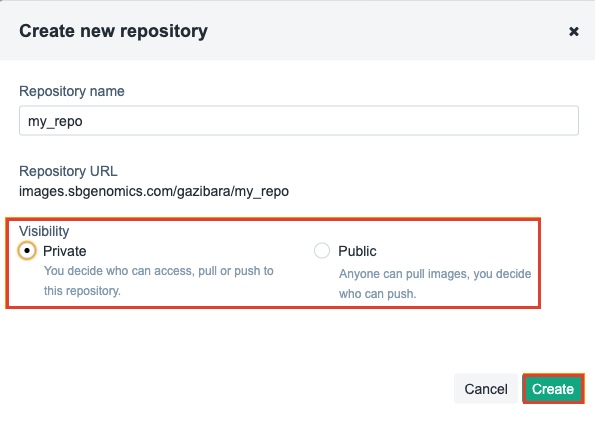
- Click Create repository.

- Enter the name of your repository. Repository name must be at least 3 characters long and can only contain lowercase letters, numbers,
.,-and_. - Choose if your repository will be private or public (see below).
- Click Create.
Your repository is now created. The next step pushing an image to your repository.
Alternatively you can create a repository by pushing an image from your local machine to the Seven Bridges image registry. The visibility of the repository will be set to private by default.
Adjust privacy settings
- Click on Developer in the main menu bar and choose Docker registry.
- Click the cog icon next to the desired repository. You can now see repository settings.
- In the Privacy section adjust your repository's privacy settings (see below for details about each of the privacy settings):
- If your repository is currently a public repository, you will see the Make private button. Clicking this button will make the repository private.
- If your repository is currently a private repository, you will see the Make public button. Clicking this button will make the repository public.
What each of the repository privacy settings means.
Public | Private |
|---|---|
|
|
|
|
|
|
Manage member access
Manage access to your repositories by adding members and setting their permissions.
Access the Manage members tab
- Click on Developer in the main menu bar and choose Docker registry.
- Click the members icon . The following window is displayed.

Add a member
- In the section labeled Invite new members, type the member's username. Note that only existing Platform users who are members of the project in which the repository is used can be added as members of your repository.
- Set the member's permissions in the adjacent dropdown menu:
- read - the member will be allowed to view the contents of the repository
- copy - the member will be allowed to pull images from the repository
- write - the member will be allowed to push images to the repository
- admin - the member will be allowed to do all of the above, but will also be allowed to delete a repo and images as well as manage repository privacy settings.
After adding a member to a repository, also make sure they are a member of the project the repository will be used in.
Change a member's permissions
- Open the permissions menu next to a member's username.
- Check or uncheck the desired member's permissions for the repository.
Remove a member from your repository
- Click the X icon next to the member you want to remove.
- Click Remove on the confirmation dialog, and that member will be removed from your repository.
Delete an image
Before deleting an image, please make sure it is not required by other tools and workflows.
- Click on Developer in the main menu bar and choose Docker registry.
- Click the the desired repository.
- Click the delete icon next to the desired image.
- Click Delete to confirm.
Leave a repository
You cannot leave a repository you own.
- Click on Developer in the main menu bar and choose Docker registry.
- Click the cog icon next to the desired repository.
- Click the leave icon next to the desired repository in the Actions column.
- Click Leave to confirm leaving the repository.
Delete a repository
The option for deleting a repository is only available to division administrators. In addition, when you delete a repository all accompanying images will be deleted as well. All related tools and workflows will no longer work. This action is irreversible.
- Click on Developer in the main menu bar and choose Docker registry.
- Click the cog icon next to the desired repository.
- Click Delete.
- Click Delete once again to confirm your action and the repository will be deleted.
Delete an image
The option for deleting an image is only available to division administrators. When you delete an image, all related tools and workflows will no longer work. This action is irreversible.
- Click on Developer in the main menu bar and choose Docker registry.
- Click name of the repository that contains the image you want to delete.
- Click the image name.
- Click Delete.
- Click Delete once again to confirm your action and the image will be deleted.
Updated 3 months ago
