Overview
The Volumes API contains two types of calls: one to connect and manage cloud storage, and the other to import and export data to and from a connected cloud account.
Before you can start working with your cloud storage via the Seven Bridges Platform, you need to authorize the Platform to access and query objects on that cloud storage on your behalf. This is done by creating a "volume".
A volume enables you to treat the cloud repository associated with it as external storage for the Platform. You can 'export' files from the volume to the Platform to use them as inputs for computation. Similarly, you can write files from the Platform to your cloud storage by 'importing' them to your volume. Learn more about working with volumes.
Note that there are three options, but two are on AWS (AWS East and AWS EU). However, you can only obtain write access to AWS buckets in the same region as your Platform infrastructure. If you run the Platform on AWS in either the US East region or the EU region, you have full read-write access to your data stored in Amazon Web Services' S3 in that same region.
You have read-only access to data stored in any other AWS region and to data stored in Google Cloud Storage. Conversely, if you run the Platform on Google Cloud Platform, you have read-write access to data stored in Google Cloud Storage, and read-only access to data stored in Amazon Web Services S3 in any region.
Recall if you chose a cloud infrastructure provider when you signed up for the Platform. If you didn't choose a cloud provider at sign-up, you are running the Platform on AWS US East. If you signed up for the Platform after early 2016, you had the option to select between AWS US East and GCP.
If you signed up from early 2017, you will have had the additional option to select AWS EU as your cloud provider.
Procedure
This short tutorial will guide you through setting up a volume. You'll register your Amazon S3 bucket as a volume, make an object from the bucket available on the Platform, then move a file from the Platform to the bucket.
Once a volume is created, you can issue import and export operations to make data appear on the Platform or to move your Platform files to the underlying cloud storage provider.
In this tutorial we assume you want to connect to an Amazon S3 bucket. The procedure will be slightly different for other cloud storage providers, such as a Google Cloud Storage bucket. For more information, please refer to our list of supported cloud storage providers.
Prerequisites
To complete this tutorial, you will need:
- An Amazon Web Services (AWS) account
- One or more buckets on this AWS account
- One or more objects (files) in your target bucket
- An authentication token for the Seven Bridges Platform. Learn more about getting your authentication token. Note that to write to an S3 bucket, as demonstrated below, you will need an account on the AWS deploy of the Seven Bridges Platform.
Step 1: Add an S3 bucket as a volume
To set up a volume, you have to first register an AWS S3 bucket as a volume. Volumes mediate access between the Seven Bridges Platform and your buckets, which are local units of storage in AWS.
You can register an AWS S3 bucket as a volume with an IAM user through the following steps below.
(Optional You can also provide your KMS ID if you opt to use KMS for your encryption.
1a: Create an IAM (Identity and Access Management) user
Follow AWS documentation for directions on creating an IAM user.
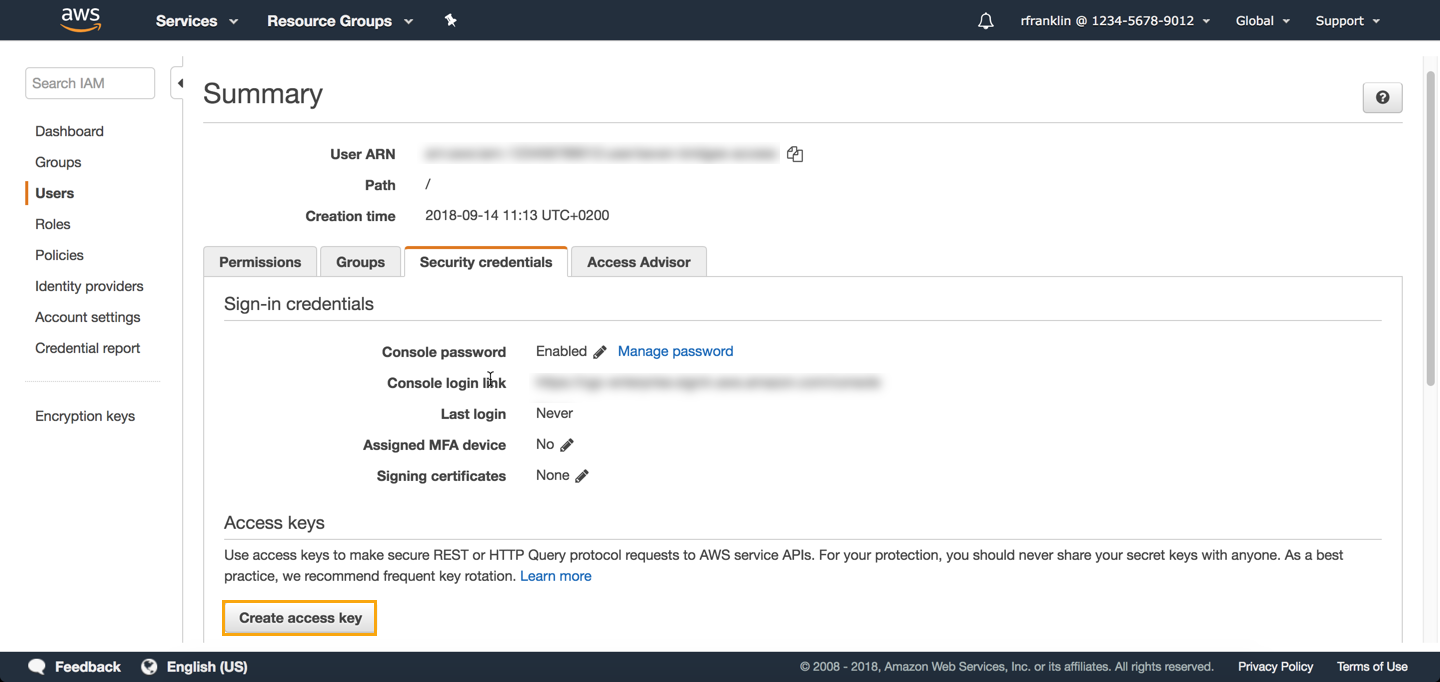
1b: Create access keys for the IAM user
- In the list of IAM users, locate the IAM user you created above. Click the username to configure your options.

- Click the Security credentials tab.
- In the Access keys section click Create access key. You get two keys, Access key ID and Secret access key.

1c: Attach your volume to the Platform
- From the main menu bar on the Platform, select Data > Volumes.
- Click Attach volume. If you already have attached volumes, in the top-right corner click Connect Storage.
- Select amazon web services.
- Enter Access key ID and Secret access key you obtained in section 1b above.
- Click Next.
- In the Bucket name field enter the name of the S3 bucket you wish to connect. Volume name is the display name of the volume on the Platform and will be generated automatically.
- (Optional) Enter volume description.
- Set access privileges for the volume. Available options are:
- Read only (RO) - You will be able to read files, but won't be able to add them to the volume.
- Read and Write (RW) - You will be able to read files and also add files to the volume.
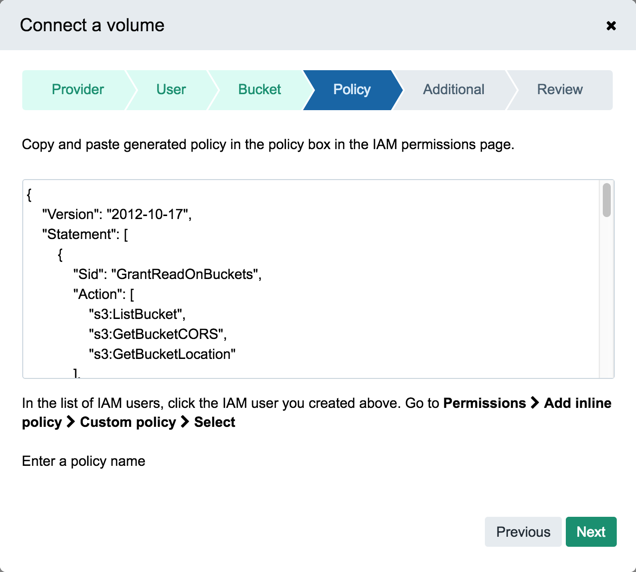
- Click Next. You are now taken to the generated policy.

- Copy the content of the box.
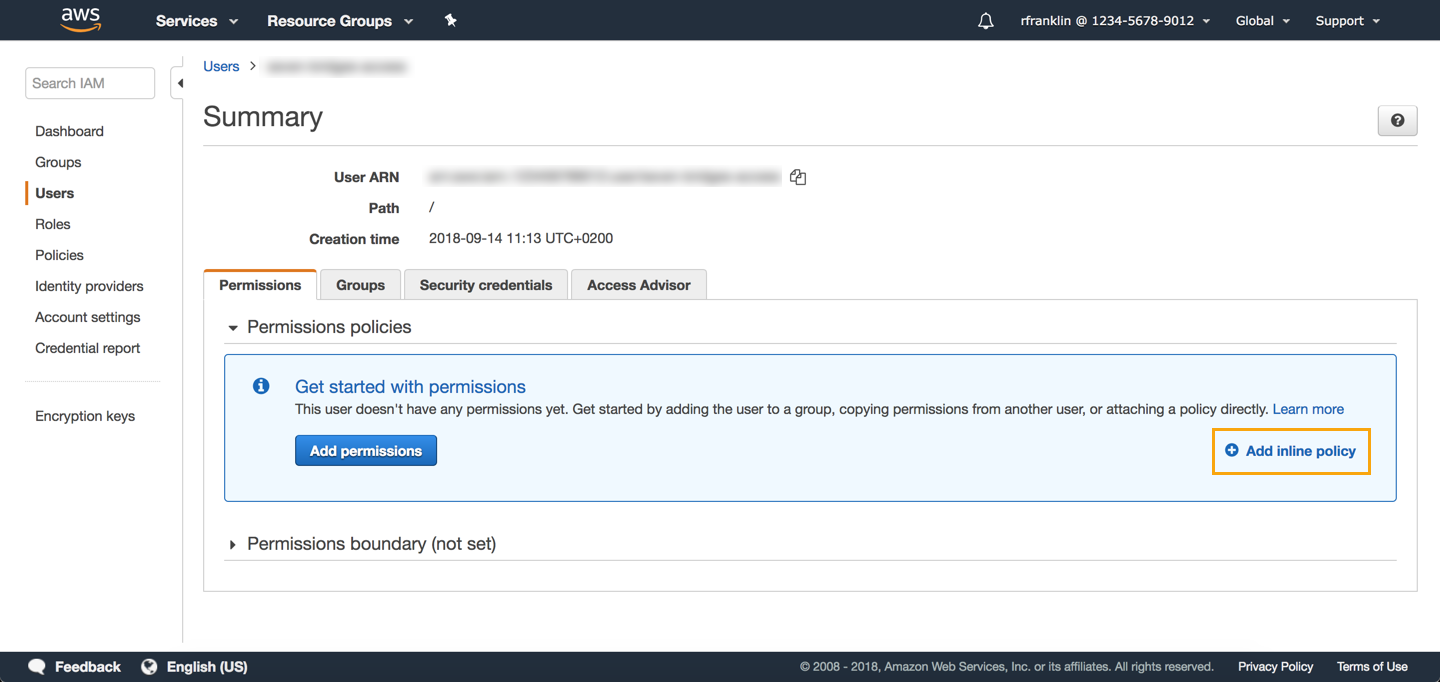
- In the list of IAM users in AWS Management Console, locate the IAM user you created in section 1a. Click the username to configure your options.
- On the Permissions tab, click Add inline policy, as shown below.

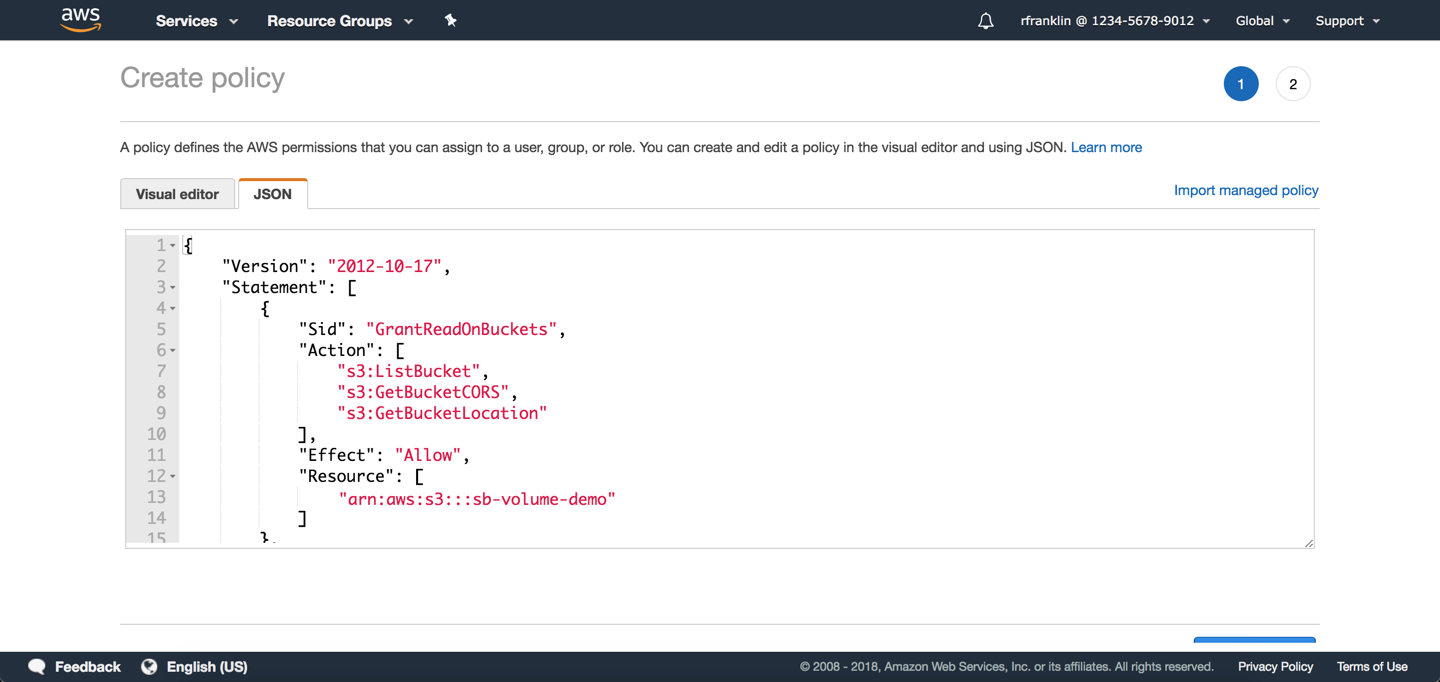
- Select the JSON tab and replace the existing content by pasting the code you copied in step 10.

- Click Review policy.
- Enter a descriptive policy name, e.g. sb-access-policy. Note that you can only use alphanumerics and the following characters: +=,.@-_ .
- Click Create policy.
- Then, go back to the Platform and click Next in the wizard.
- In the Endpoint field enter s3.amazonaws.com. Leave default values for other settings.
- Click Next. You can now review your volume connection settings.
- Finally, click Connect. Your volume should now be connected to the Platform and visible in the list of volumes.
Step 2: Make an object from the bucket available on the Platform
Now that we have a volume, we can make data objects from the bucket associated with the volume available as "aliases" on the Platform. Aliases point to files stored on your cloud storage bucket and can be copied, executed, and organized like normal files on the Platform. We call this operation "importing". Learn more about working with aliases.
To import a data object from your volume as an alias on the Platform, follow the steps below.
2a: Launch an import job
To import a file, make the API request to start an import job as shown below. In the body of the request, include the key-value pairs in the table below.
Key | Description of value |
|---|---|
| Volume ID from which to import the file. This consists of your username followed by the volume's name, such as |
| Volume-specific location pointing to the file to import. This location should be recognizable to the underlying cloud service as a valid key or path to the file. Please note that if this volume was configured with a |
| This object should describe the Platform destination for the imported file. |
| The project in which to create the alias. This consists of your username followed by your project's short name, such as |
| The name of the alias to create. This name should be unique to the project. If the name is already in use in the project, you should use the overwrite query parameter in this call to force any file with that name to be deleted before the alias is created. If name is omitted, the alias name will default to the last segment of the complete location (including the |
| Specify as |
POST /v2/storage/imports HTTP/1.1
Host: api.sbgenomics.com
X-SBG-Auth-Token: 1e43fEXampLEa5523dfd14exAMPle3e5
content-type: application/json{
"source":{
"volume":"rfranklin/sb-volume-demo",
"location":"example_human_Illumina.pe_1.fastq"
},
"destination":{
"project":"rfranklin/my-project",
"name":"my_imported_example_human_Illumina.pe_1.fastq"
},
"overwrite": true
}The returned response details the status of your import, as shown below.
{
  "href": "https://api.sbgenomics.com/v2/storage/imports/Yrand0mERJY4F3grand0mzh5UuTdw2Ap",
  "id": "Yrand0mERJY4F3grand0mzh5UuTdw2Ap",
  "state": "PENDING",
  "overwrite": true,
  "source": {
    "volume": "rfranklin/sb-volume-demo",
    "location": "example_human_Illumina.pe_1.fastq"
  },
  "destination": {
    "project": "rfranklin/my-project",
    "name": "my_uploaded_example_human_Illumina.pe_1.fastq"
  }
}
Locate the id property in the response and copy this value to your clipboard. This id is an identifier for the import job, and we will need it in the following step.
2b: Check if the import job has completed
To check if the import job has completed, make the API request to get details of an import job, as shown below. Simply append the import job id obtained in the step above to the path.
GET /v2/storage/imports/Yrand0mERJY4F3grand0mzh5UuTdw2Ap HTTP/1.1
Host: api.sbgenomics.com
X-SBG-Auth-Token: 1e43fEXampLEa5523dfd14exAMPle3e5
content-type: application/json
The returned response details the state of your import. If the state is COMPLETED, your import has successfully finished. If the state is PENDING, wait a few seconds and repeat this step.
You should now have a freshly-created alias in your project. To verify that a file has been imported, visit this project in your browser and look for a file with the same name as the key of the object in your bucket.
Step 3: Move a file from the Platform to the bucket
You've successfully created an alias on the Platform for a file in your S3 bucket. You can also move files from the Platform into your connected S3 bucket. This operation is known as 'exporting' to the volume associated with the bucket. Please keep in mind that public files, files belonging to platform-hosted datasets, archived files, and aliases cannot be exported. Also, note that export to a volume is available only via the API (including API client libraries), and through the Seven Bridges CLI.
For more information, please see working with aliases.
Follow the steps below to move a file from Platform to an object in your bucket.
3a: Upload a file to a project
Before you can export a file from the Seven Bridges Platform, you must upload a file to a project. To upload a file, follow the steps below:
- Upload a file to your project using the integrated upload functionality, the command line , using an FTP or HTTP(S) server, or the API.
- Locate and copy the file ID. From the various upload mechanisms, you can find the file ID as follows:
- Upload via the Platform's visual interface - Once the file has uploaded, locate the file in the Files tab of the relevant project. Click on the file's name. A new page with details about your file should open. Locate the last segment of this page's URL, following
/files/. This is the uploaded file's ID. For example, the file ID ofhttps://igor.sbgenomics.com/u/rfranklin/volumes-api-project/files/567890abc9b0307bc0414164/is567890abc9b0307bc0414164. - Command line uploader - In the output of the command line uploader, note that the first column in the line that corresponds to the uploaded file. This is the uploaded file's ID.
- FTP or HTTP(S) server - Locate the file's ID in the same way as for files uploaded through the visual interface.
- API - Issue the API request to List all files within a project. The IDs of each file are listed next to the key id in the response body.
- Upload via the Platform's visual interface - Once the file has uploaded, locate the file in the Files tab of the relevant project. Click on the file's name. A new page with details about your file should open. Locate the last segment of this page's URL, following
3b: Move a file from your project on the Platform to the bucket
When you export a file from the Platform to your volume, you are writing to your S3 bucket.
Make the API request to start an export job to move a file from the Platform to your bucket, as shown below. In the body of your request, include the key-value pairs from the table below.
Key | Value |
|---|---|
| This object should describe the source from which the file should be exported. |
| The Platform-assigned ID of the file for export. |
| This object should describe the destination to which the file will be exported. |
| The ID of the volume to which the file will be exported. |
| Volume-specific location to which the file will be exported. This location should be recognizable to the underlying cloud service as a valid key or path to a new file. Please note that if this volume has been configured with a |
| Service-specific properties of the export. |
| S3 server-side encryption to use when exporting to this bucket. Supported values:
|
| Provide your AWS KMS ID here if you specify |
POST /v2/storage/exports HTTP/1.1
Host: api.sbgenomics.com
X-SBG-Auth-Token: 1e43fEXampLEa5523dfd14exAMPle3e5
content-type: application/json{
"source": {
"file": "567890abc9b0307bc0414164"
},
"destination": {
"volume": "rfranlin/sb-volume-demo",
"location": ""
},
"properties": {
"sse_algorithm": "AES256"
}
}The returned response details the status of your export, as shown below.
{
  "href": "https://api.sbgenomics.com/v2/storage/exports/5rand0mXYcDQ3xtSHrKuK2jXNDtJhMBN",
  "id": "5rand0mXYcDQ3xtSHrKuK2jXNDtJhMBN",
  "state": "PENDING",
  "source": {
    "file": "567890abc9b0307bc0414164"
  },
  "destination": {
    "volume": "rfranklin/sb-volume-demo",
    "location": "output.vcf"
  },
  "started_on": "2016-06-15T19:17:39Z",
  "properties": {
    "sse_algorithm": "AES256",
    "aws_storage_class": "STANDARD",
    "aws_canned_acl": "public-read"
  },
  "overwrite": false
}
Locate the id property in the response and copy this to your clipboard. This id is the identifier for the export job, and we will use it in the next step to verify that the job has completed.
3c: Check if the export job has completed
To check the status of your export job, make the API request to get details of an export job. Append the export id you obtained in the step above after the path.
GET /v2/storage/exports/5rand0mXYcDQ3xtSHrKuK2jXNDtJhMBN HTTP/1.1
Host: api.sbgenomics.com
X-SBG-Auth-Token: 1e43fEXampLEa5523dfd14exAMPle3e5
content-type: application/json
The returned response details the state of your export. If the state is COMPLETED, your export has successfully finished. If the state is PENDING, wait a few seconds and repeat this step.
Your bucket now contains the file that was uploaded to the Platform in step 1. To verify that a file has been exported, visit your project on the Platform and locate the file you originally uploaded. It should be marked as an alias. This means that the content of the file has been moved from storage on the Platform to your S3 bucket, and that the Platform's file record been updated accordingly.
Congratulations! You've now registered an S3 bucket as a volume, imported a file from the volume to the Platform, and exported a file from the Platform to the volume. Learn more about connecting your cloud storage from our Knowledge Center.
Updated 3 months ago
