Manage via RHEO visual interface (GUI)
Overview
This feature is available as an add-on. Learn more about how you can get started with Seven Bridges RHEO today.
Seven Bridges RHEO allows you to automate complex analysis workflows on the Seven Bridges Platform with minimal manual intervention. Automations and automation runs can be managed either via CLI, API or the visual interface (GUI) which will be explained in this guide. Learn more about Seven Bridges RHEO.
Managing automation runs via the visual interface is a two-part feature that involves a developer who will first create the Automation and specify all parameters that will be required for the proper execution of the automation run (input parameters, code package, etc.) and you as a user who will populate those parameters and then execute automation runs.
This guide will show an example of what the automation run parameters might look like, but the exact parameters for your specific automation will depend on what has been specified by the developer. Learn more on how to create an automation script as a developer.
Elastic executionTo utilize the increased parallel run capacity, you will need to choose the dedicated elastic execution mode. The automations will be run on the AWS Fargate instance. See Elastic execution mode.
Automations dashboard
To access the Automations dashboard, click Automations in the main menu. In case you don't see the Automations option in the main menu, please get in touch with our Support who will enable it for you.
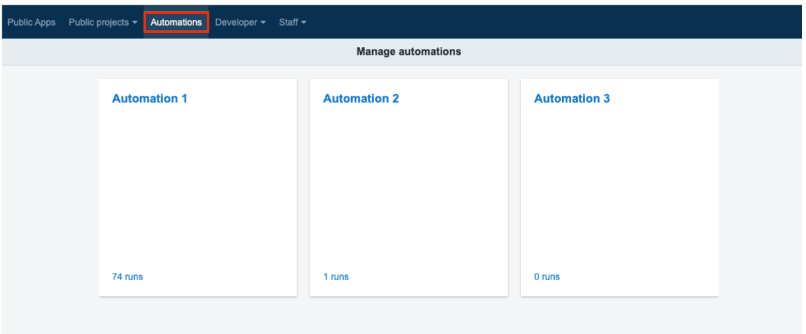
All available Automations that have been created by the developer and to which you were added as a member are displayed along with the following options:
- Start a new automation run - click the Automation title to start creating a new Automation run (see Start a new Automation run.
- View all automation runs - to view all Automation runs for an automation, click the number of runs in the lower left corner of each automation (see Review automation runs.
Start a new Automation run
To start a new Automation run:
- Click Automations in the main menu.
- Click the title of the automation you want to start a new run for.
- Define the automation inputs which can be required or optional. The screenshot below demonstrates what the parameters for an automation run may look like. The actual parameters that you will need to enter will depend on what has been specified by the Automation developer (learn more about creating Automations as a developer.
The following are some of the parameters that you may see:
- Version - choose the version of the code package that will be used for the Automation run; a code package contains the actual code package file (a .zip file) with instructions on executing an analysis, information on the version of the script that's being run, the time and date the code package was registered, etc.
- String input - maximum length for a string input is 2000 characters
- Files - files can be selected from one of several locations (see Choose Files below).
- Memory limit - specify the memory limit for this Automation run. The default limit is 500Mb, while the maximum allowed value is 4000Mb If omitted, the value will be inherited from the code package or the Automation. When the automation exceeds this limit it will automatically be aborte
- Automation description - the description for this automation as set by the developer.
- Click Start automation.

Example of optional inputs and settings
To define optional inputs and settings. click the arrow next to the title.
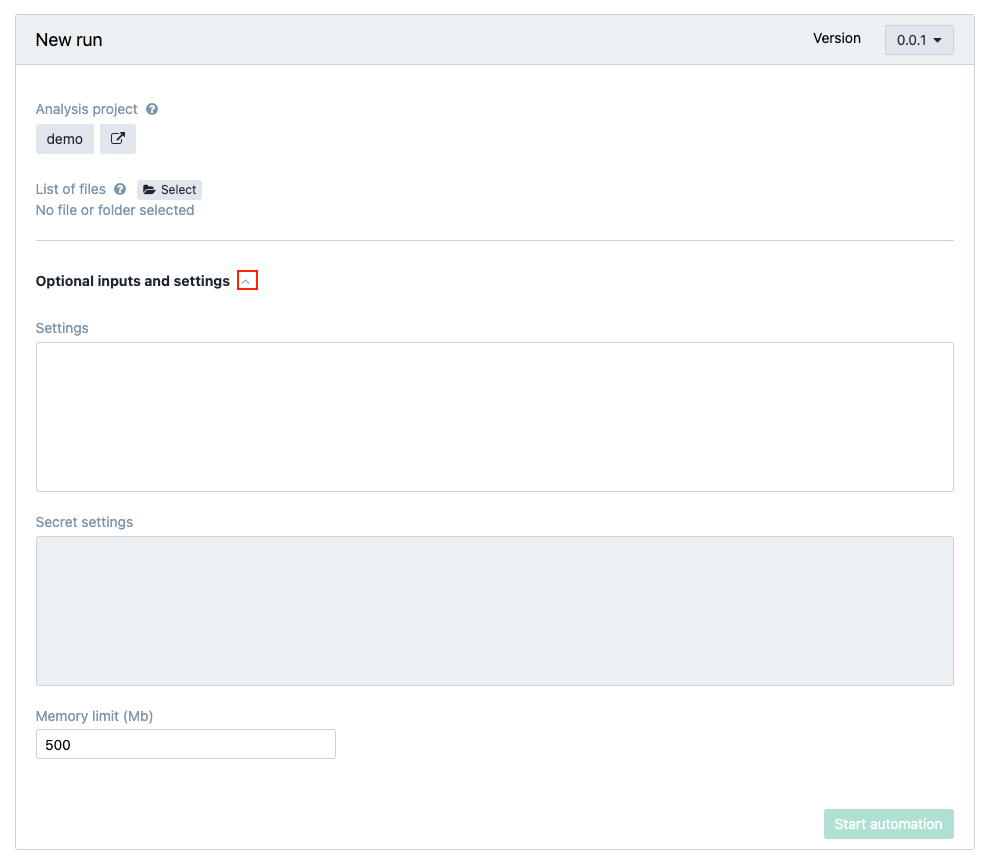
The following options are available:
-
Settings - The Automation settings are defined by the developer by default. However, here you can enter different settings and override them. The settings are entered as multi-line JSON string input.
-
Secret settings - Secret settings can be used to pass user credentials like passwords or tokens into an automation without the risk of exposing these credentials to someone else. The secret settings are entered as multi-line JSON string input.
Learn more about Automation settings and secret settings.
Choose files
The file picker allows you to choose a single file or multiple files, as well as files from a folder. In addition, you can select files from the following locations:

- Projects - All of your projects will be displayed under the Projects tab. Click on a project and choose files. Note that you can use the dedicated search option to find a project quickly. If you start an Automation run from inside one of your projects, the current project is already pre-selected and cannot be changed (see Run automation runs from within a project).
- Public files - click the Public files tab to access all publicly available files on the Platform and select them for your automation run.
- Volumes - if a volume (Amazon Web Services or Google Cloud Platform) is connected to your project, you can use this option to select files from a volume (learn more about managing volumes.
Please keep in mind that files can come from multiple projects or multiple volumes, but cannot come from both a volume and project for the same input

Elastic execution mode
To utilize the increased parallel run capacity, enable the dedicated elastic execution mode. The automations will be run on the AWS Fargate instance.
To enable the elastic (AWS) execution mode:
-
Click Optional inputs and settings.
-
Enter the following snippet under Settings:
 {
   "sb_execution_mode": "aws"
}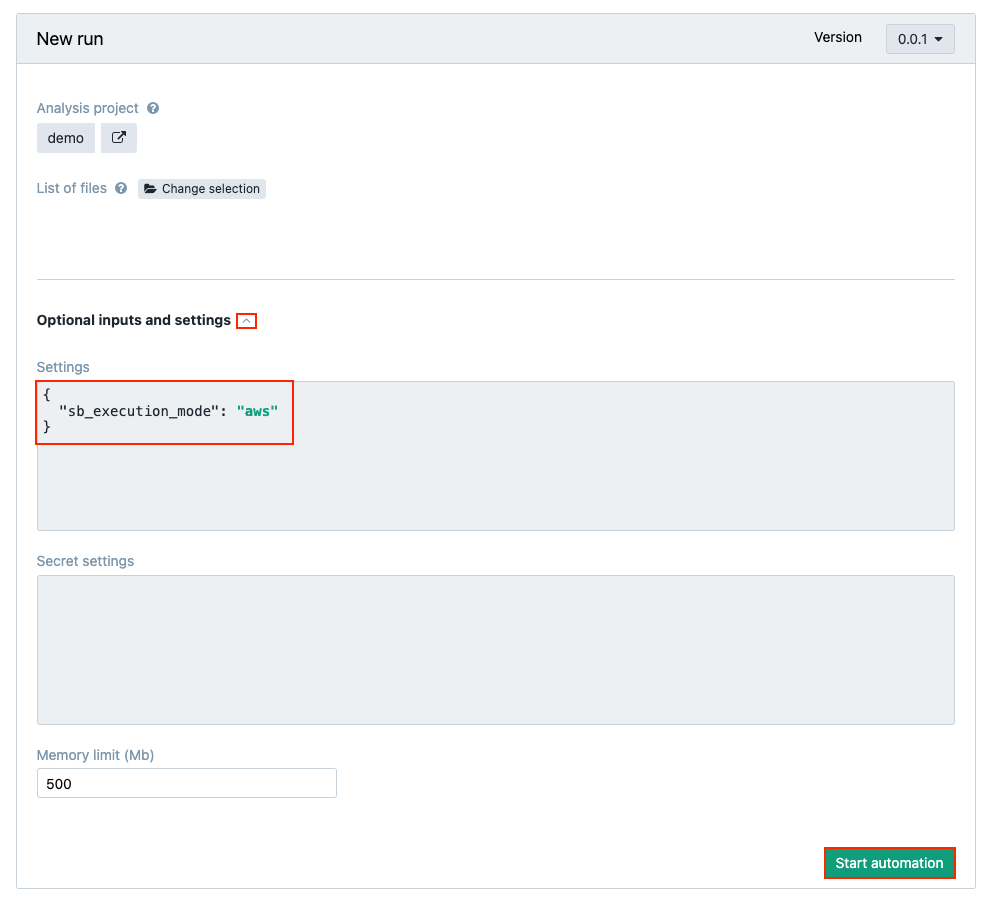
-
Click Start automation.
Re-run an automation:
To re-run an automation:
- Click Automations in the main menu.
- Click the number of runs in the lower left corner of the desired automation.
- Click the re-run icon under Actions next to the desired run.

- Define the automation inputs (see Start new automation. Note that you can choose a different version of the code package when re-running an automation.
- Click Start automation.
Abort an automation
To abort a running automation:
- Click Automations in the main menu.
- Click the number of runs in the lower left corner of the desired automation.
- Click the name of the automation run you want to abort.
- Click Stop.
- Click Abort.

The automation will be scheduled for termination and stopped.
Review automation runs
To review automation runs:
- Click Automations in the main menu.
2.Click the number of runs in the lower left corner of the desired automation. The list of all automation runs is displayed.

The following information and options available for each of the runs:
- Search - enter keywords to search for a specific automation run.
- Status - filter automation runs based on their status (e.g. choose Finished to only display completed automation runs).
- Creators - filter automation runs based on the user that created them.
- Projects - filter automation runs based on the project they belong to; this filter is automatically active if you opened this page from inside one of your projects (see Run automation runs from within a project)
- Name - the name of the automation run which is also a link for accessing the automation run overview page.
- Created by - the user that created the automation run.
- Created on - the date and time the automation run was started.
- Version - the version of the code package that was used to run the automation.
- Duration - the time it took for the automation run to complete.
- Status:
- Queued for execution - the automation run has been queued for execution, and it will proceed to Sent to execution state shortly.
- Sent to execution - the automation run has been submitted for execution, and it will proceed to Running state shortly.
- Queued for termination - the automation run has been submitted for termination after the user aborted it and will proceed to Aborted state shortly.
- Running - the automation run is in progress.
- Aborted - the automation has been cancelled i.e. aborted by you.
- Finished - the automation run has been completed successfully.
- Failed - the automation run failed to complete.
- Actions - the option for re-running an automation.
Automation run overview page
Each Automation run has an overview page which is generated the moment you start it. This page can be accessed during the automation run as well as after the run has been completed. The available options will be different according to the current status (running, completed) which is further discussed below. To access the automation run overview page:
- Click Automations in the main menu.
- Click the number of runs in the lower left corner of the desired automation. The list of all automation runs is displayed.
- Click the name of the automation run you want to access the overview page for.
The Automation run overview page is displayed.

The following information and options are available:
- Status - the status of the Automation run is displayed in the upper left corner. Possible Automation statuses are listed in the previous section.
- Download stats - the option for accessing the state file (available while the automation is running) and the log file (see below).
- Re-run - start this Automation run again and optionally change the parameters (see Re-run an automation).
- General information
- Created on - the date and time the automation run was created.
- By - the user the automation run was started by.
- Duration - how long it took for the automation run to complete.
- Automation - the Automation used for the automation run.
- Version - the version of code package used for the automation run
- Re-run from - if this is a subsequent run, the name of the Automation used.
- Inputs - the list of inputs used for the automation run.
- Outputs - the outputs of the automation run which is available after the execution.
Rename an automation run
To rename an automation run:
- Click Automations in the main menu.
- Click the number of runs in the lower left corner of the desired automation. The list of all automation runs is displayed.
- Click the name of the automation run you want to rename.
- Click the edit icon next to the name of the automation run.
- Enter the new name.
- Click the check icon to save the new name.

Download automation run statistics
For each automation run the following statistics are available:
- Log file - A file containing all error, warning, info, and debug messages produced by an Automation run. The log file can be accessed while the automation is still running, but its content may lag behind the execution by a few minutes. Please note that the log file will not be available in case the automation run fails soon after it was started.
- State file - A file which contains detailed information about the execution state of an Automation run in JSON format. This file can be accessed via the Automation run overview page while the Automation is still running.
To access the statistics:
- Click Automations in the main menu.
- Click the number of runs in the lower left corner of the desired automation.
- Click the name of the automation run you want to access the statistics for.
- Click Download stats in the upper right corner and choose an option.

Run automations from within a project
The purpose of this functionality is to bind automations to a single project. As a result, the visual interface will remember your current project and constrain the scope of the automation to that project.
This is useful when selecting automation input files as you will choose files from your current project or when viewing automation runs as only runs associated with your current project will be shown.
To exit the project context, access the automation by choosing Automations from the main menu.
Prerequisites
Automations must be flagged as “project-based” by the automation developer if you want to be able to start them directly from within any of your projects.
Procedure
Apart from using the Automation dashboard (see above), you can also run automation runs from the Automation launchpad within your project.
- Click Select automation inside the Automation launchpad in the upper right corner.
- Click Run to start defining the automation run parameters (see Start a new automation run).
- Alternatively click View runs to review all automation runs associated with that project. (see Review automation runs).
- Or click All automations to return to the Automation dashboard while retaining your current project context.

Manage email notifications for automations
Learn more about managing email notifications for automations.
Updated 9 months ago