Run a Data Studio analysis
Run an analysis
Data Studio allows you to enter and execute Python, R or Julia code to perform further analyses on your data on the Seven Bridges Platform. This page will explain how you can access Data Studio from a project on the Platform, set up an analysis and execute code within the analysis. To run an analysis, you will need execute permissions in the project where the analysis is created.
Access Data Studio
To access Data Studio from your project, proceed as follows:
- Open the desired project on the Seven Bridges Platform.
This project should contain the data that you want to analyze further using Data Studio. - Click the Data Studio tab. This takes you to the Data Studio home page. If you have previous analyses, they will be listed on this page.
Create an analysis
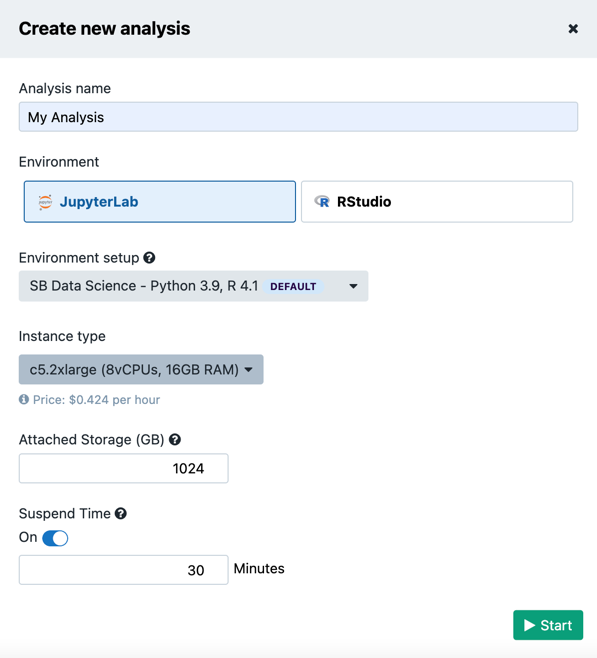
- In the top-right corner click Create new analysis. The Create new analysis dialog is displayed.

- Name your analysis in the Analysis name field.
- Select JupyterLab or RStudio as the analysis environment.
- Select the Environment setup. Each setup is a preinstalled set of libraries that is tailored for a specific purpose. Learn more.
- Select the instance type for the analysis.
The Instance type list displays available instances along with their disk size, number of vCPUs and memory (shown in brackets). The default instance is c5.2xlarge that has 1024 GB of EBS storage, 8 vCPUs and 16 GB of RAM. - Set the attached storage size. Attached storage includes disks that are used by the computation instance as storage capacity during task execution and can be between 2 and 4096 GB. Learn more.
- (Optional) Change suspend time settings.
- Click Start.
The Platform will start acquiring an adequate instance for your analysis, which may take a few minutes.
Analysis initialization goes through the following stages:
- Allocating the instance for your analysis - Obtain an instance from the cloud infrastructure provider.
- Preparing the allocated instance - Load the required software onto the instance.
- Doing the final setup of the analysis environment - Perform final settings and initialize the analysis environment.
When the initialization process is completed, you will be automatically taken to the editor.
Suspend time
Suspend time is the period of analysis inactivity after which the instance is stopped automatically. Inactivity implies that:
- There is no keyboard or mouse activity in the editor.
- No files have been modified or created in the analysis (in the
/sbgenomics/workspacedirectory).
Apart from stopping the instance, this also includes stopping the analysis and saving all analysis files and output files. Besides the option to enable or disable suspend time for an analysis, you also can also adjust its duration. Minimum suspend time is 15 minutes.
Updated 3 months ago
